Kong Fu...

by Roman aka jar

posted by Roman, jarhead, Kong

Hi there,

this Kong Fu really hurts my heart again after these moments seem to rise in the past. After several painting classes, which i really did enjoy my email and private messaging boards are completly overwhelming me like a thundering whirlwind or a horde of mad elephants.

For sure i did try my best the last week, keep up with everybody, most important my friends and comissioners, but also getting back to all the questions dropping in from the painting classes.

As i always think only truth brings me further in my life i have to say to those who are waiting my answer that i am totally leached out in this case. Even i should write some more emails and PMs i have to commit to myself that i can't if i will not spent most of my day time in front of the computer typing there. The last week really was only typing, typing, typing most of my time and typing.

And for those thinking "Ay, he can type here, why doesn't he can't type my answer at all?" - i am really sorry, typing in here is more like vacation from typing emails all day long.


I will try to get back to you soon, but can not promise anything. I am focusing on my workbench the next weeks where a lot of fun and work is waiting for me. Please don't get me wrong in these sentences written here but i am just off the hook with my brain, while typing all day long... i promise someday mostly all of your answers will be answered in the Tutorial section of MASSIVE VOODOO, at least we try...


If you got any questions don't hesitate to comment yours in this place!


Best Regards
Roman

Tutorial - Building a base with parts of old electronics

by Roman aka jar

posted by Roman, jarhead, kong

Huh? What he is talking about? Using old electronics on a base...

Oh yeah, haha! Let me explain.

Building a base with parts of old electronics

What you need for building exactly this base shown here:

- a socket
- an old electronic piece that doesn't work anymore
- small screw drivers
- arm power
- Attention to not hurt yourself
- whatever tool kit might be good for yourself
- bravery
- super glue
- sand
- some straws
- some old cables, for examples from your old stereo
 

Get it on...

Ok, first of all i want to mention that this is for sure won't be everyone's favorite idea to build up their next bases, haha. This is just a thought, that might inspire some of you.

I did this, because the miniature, Carlos from Artefactory was standing around a long while now in early Work in Progress without a base and i really got inspired by Raffa's great version of this model. Mine isn't converted at all, simply paint him out of the box with no big story told around him. But i wanted to have a base, which makes him look like a working machine on a rusty, chaotic carbage planet.

As my old camera, which got broke a while ago was still laying ahead of me (it was about 6~7 years old, so no consideration of having it repaired), i thought of playing butcher again as i did with my old MiniDisc Player some months ago.

Pay MASSIVE attention to the following quote of the Chapuchin:


"Before we forget:
Never destroy electronics when you don't know what waits for you inside. For example, a PC power supply or a television have capacitors that can store enough energy to give you a nice shock. I would advice to stick to small, low-powered stuff that, in the ideal case, runs with batterys.

Cheers,
Raffa"

Miniature, socket, dead camera - ready to go.


Putting the miniature and the socket away again and preparing myself to ripp off that broken camera, yeaha!. Please pay attention not to harm yourself while using uncontrolled Kong-Power, always think first and then act.

I did start with screwing out the tiny bolts on the outside of the camera while using small screw drivers for this task.


The butchery went on carefully ripping out whatever i could, first always driving out the bolts, then using enourmous Kong-Power for the ripping parts. Please make sure to really pay attention to avoid hurting yourself. Slow and precious working at this point. If you are scared try to throw your old electronic from your balcony for the first steps. Please make sure that you always use small electronics that broke up for something like that, not a TV or Computer, that is too much as we work with tiny miniatures in here, we won't need a lot of this stuff.


Building the base...


Before i did start building up the base from this chunk, i did check my metal part box, where i collect such weirdo things from such experiments for more parts to bring them up to the base.


I put everything together and build it up on the battery case from the camera for the main part. Super glue was used to bring everything in place - it's like making corn flakes in the morning, haha. I did bring in some sand in the wet super glue to make it more harmonic in the end, more realistic, there would never been a place where chunk lies around without dirt around in my oppionion - also checked back the kitchen for some straws i want to lay under the main base as there has been some space left.


Gluing the straws in place i did take some old cable strings and also put them in. The finished chaotic junkyard base looks like this:


After Priming the base, i did put a hole in the base to set the miniature up to with a pin. Unpainted result does look like this. Painted result for sure will be delivered in the upcoming days. Everything still Work in Progress, also the miniature ;)


Hope you like this strange way to build up a base. Keep doing experiments and always pay attention to your safety

Here is another example where i had used some parts of my old MiniDisc Player:


Keep on happy painting!
Regards
Roman


Inspirational Links by the Kong

by Roman aka jar

posted by Roman, jarhead, Kong

Don't forget to look at Raffa's last great mini - 3 days, pffft, you are crazy man: click!

Just checking back some old links while cleaning up my browser shortcut links - for sure i did found something i want to share with you... may you find a pearl while browsing. If you ain't got the time, don't worry, that is why i am cleaning them up, haha - just click the different links if you feel bored ;)

First this very cool duel of two gladiators i saw. I am not really into the thing about if this is historical correct, but i like the dynamic set of the models: Click!

 Posemaniacs, cool stuff!

Third, "Underwater Museum", somehow loved that picture.
A gorilla silverback that is what i call massive :)


Notre Dame de Paris.

Art Tutorials by Itchstudio

Something else massive!

Ok, enough for now i am getting to bed, i guess this could happen someday again, after this was only a small amount of that messy link place i have in my browser!

Have a nice weekend and keep on happy painting to you all! I guess i am out for the weekend :)

Regards
Roman

Nintphegoz - Lord of the Undeads finished!

by Raffa

Posted by Raffaele, Capuchin, Picster...

Hey everyone,
this was a small "get-my-head-free-for-new-stuff" project i made this week.

I know it's by far not my best work but somehow i like it even if it's nowhere near the quality of the promotion paintjob (damn good!!!) but i don't care as long as i get my "finally-finished-reward-banana"!


It even has fingerprints on the milliput from the base.... sorry big kong to steal your trademark hahaha *poke*

I wanted to try out how fast i could reach a level of quality i could live with and after all everything took 3 days (ok, i have to admit i've played very much Modern Warfare 2 hahaha... damn game uses too much of my free time, but it ROCKS!)

I've tried out some stuff and painted most of the surfaces with wet blending and used colors i would normally not use...
I had some fear painting this mini because of all the tiny details but after all i have to say it was really fun to paint and all that fear had no reason...
If you like this mini, buy it and try it out! I didn't even care about molding lines... because this mini basically had NONE.. very cool sculpt.

ok so much bla bla for such a paintjob.. ok i will stop, leave a comment if you like it or if you just want to tell me how much the paintjob sucks and that i shouldn't waste my time on such hasty stuff and playing MW2 :D

Raffa

Jungle Boogie

by Anonymous

posted by Yvonne, Vhaidra

Just want to bring some background music to you :-)

Kool And The Gang - Jungle Boogie

Greetings Yvonne

Miniatures up to ebay...

by Roman aka jar

posted by Roman, jarhead, Kong

Hi there again,

today it will be a bigger update of some miniatures going out to ebay. This will inform you about what is going out for Sale. Go have a look! May those miniatures find a good new home!


First i want to start with a display model of "El Capitan Alatriste" in 70 mm scale (ahh i did a funny accident in the banner), painted by Robert, muhani or known as the Chimp on MASSIVE VOODOO. A wonderful model in my eyes and the starting price is fair as always. Check out the ebay auction here!


The latest painted Uruk Hai, painted up for gaming purposes is also up for ebay!


Also the latest painted Zombie Ashlee from Hasslefree will be out for Sale. Check her out here!

So far... Happy Bidding!
Regards
Roman

Show some balls reminder...

by Roman aka jar

posted by Roman, jarhead, Kong


Let's make some rumble in da jungle, uh uh uh ah ah!. Did you ever hear of this Painting Competition ending in march this year? No? Now then hurry up, grab your balls and show your creative ball results - further information you can read here!

And if you got the energy than spread the word for this coriuos but special painting and creative experience :) 

You can find the "Show some balls! Comp" in the right naviation bar. If you still ain't got the colour you where looking for your ball take this as an inspiration!

Workshop Review Munich

by Roman aka jar

Hey Ho Hooray...

anther painting class has passed at the last weekend and this for sure was a special experience.

Thanks to my man Jim for making everything ready to rumble at this place and also to the Orga Crew of the tabletop gaming competition of the "Isauren 2010". It was my pleasure to get to know you guys. Great work from your side, for us and for all the tabletopgamers around.

Again a special Thx goes out to my man Raffa for joining me at this workshop again with his experience and friendship (he is solid like a rock when the ocean rages!!). We are not brothers in arms, we are brothers in colours, Dude! :)

Thanks to all the participants who made this weekend what it had become and all the helping hands sorrounding us. Thanks for your Feedback to the class at the Tabletopwelt.de. Also big thanks to my man Andreas for bringing me tons of great coloured pigments from Venice :) - it was really nice to meet some painting friends alongside the class and the tournament - thanks for your visits from Augsburg and Munich :)

Again a big thanks to Max Paint for supporting the class with MiniNatur.

Special Experience on this painting class??
Now Let me explain...

I had been asked to do a painting class beside a big german tabletop tournament called the "Isauren" in Munich. Normally the painting class takes 2 and a half days. At this place time was limited to 2 days. Unfortanetly we didn't not have the single room for the painting class as we did expected so starting the class did need a lot of improvisment in the start building up everything in the tournament hall where 80 ~ 90 people played their Warhammer Fantasy battles. First shocked for a moment but a short prayer to the one and only McGyver gaves energy and believe back. Thanks to all the participants for their understandement and help in this critical phase of the class. I really appreciate your patience of doing the best of the given circumstances. How we have been lucky to split the theory part in a more quiet area, haha. Wow, McGyver rules.

Even the class was only 2 days and some hours less than the usual workshop we do, i had somehow a good feeling of getting mostly all of my program done. The key to this had been that every participate should bring a prepared miniature to the class. Based, Cleaned and black basecoated. That gave us the time we lost without the Friday but also was a curse in my eyes. I guess i will never do that again. Let me explain why: When using the same model for everyone, in my case the daemonettes the participants have way more freedom on their minds while bringing my theory parts and the painting on the miniature itself together in the end. In our case i somehow felt that some always had the thought of "Having the own miniature, which they brought being painted up to fit in their army, which stands at home!"... As this was a test, i have learned a lot in it and came to the conclusion that i will never do something like that again.

Whatever, in the end the feedback to the participants has been a real pleasure to read and i am real thankful that you like what Raffa and me did to you in these 2 days with the given circumstances. I am happy that Happy Painting will rise again in your hearts and at the workbenches. That's it all about - sharing experience, get to know new things and techniques and collect your own experiences with it in the future. Always remember you can't have big muscles without training them ;)

For sure we made some photos. Thanks to everyone who helped me out with those as i had been - again - not able to do my own. Here are some impressions of the class were we all had that special experience - our place to be, yeah, special i know, haha:


A different view at it - in the middle of the tournament:


We did start off with a monster theory part on Saturday morning, only paused by a little excursion on how i build up a base, after all the participants already did so in their preparation at home:


Explanation followed by preparation, preparation followed by painting and individual assistance on individual problems:


This painting comrad really got it going with that freehand thing :)


For sure we made a groupshot of us all, sadly 3 of the participants already left the building because to catch their train in time. You might get that we had our fun, whatever the circumstances are where painting happens it can always be from the heart, haha...


Also i managed to get hold of some far view shots of the participants models... i guess everyone of you did take a good step further in their painting skills at this beginners class - at least i thought to note this after seeing your models.


In the end i want to thank you again - without your intrest in this painting class it would not have been able for us to hold it. Thanks again and i hope to see you around maybe next time when the stars are a bit better and the intense prayers to McGyver aren't needed.

It has been my pleasure - Keep on happy painting! And like Bob Ross would say: "We don't make mistakes, we have happy accidents!" :)
Regards
Roman

Finished stuff...

by Roman aka jar

posted by Roman, jarhead, Kong

It seems that the apes are happy to be back in the jungle. A lot of postings in here - i hope this doesn't go too fast for anyone reading here. If so there is still the option in reading the archives, you know - this will gain extra bananas :)

I did start two models at the latest workshops as i wasn't able to paint a daemonette again after so many i had done before. At the Hamburg Painting Class i did start a Hasslefree Zombie, named Ashlee and today i did finish her. 

Again i have to say how much i love those Hasslefrees. She was meant to be a prototype in showing painting techniques at the workshop, but you may see that i had my fun in a strange way... ok, i hope no one feels offended by the uglynes added to this miniature - i thought about that she has become zombie just a moment ago while she was fighting zombie hordes with her pistol in dark backstreets... then she got killed and got up as a zombie again, totally confused and brainless... i would shit my pants in that moment waking up with no brain... so far to the explanation... sorry for any kind of offending this might occure.

I didn't want to spent a lot of time on her, so i finished her up quickly to get to some other projects waiting for me. The base she stands on comes from Micro Art Studio.


Still not sure on the way my camera works when taking a photo of a miniature in the photobox, really need help her badly @ Raffa, haha. Whatever, here she goes or better stumbles... and i also took a reference on her - that is always important, haha - reference link!


Hasslefree's Zombie Ashlee, 28 mm


The other model i did start on the last weekend has been a Games Workshop Uruk Hai from their Lord of the Rings Range, prepared in way to less time before the workshop. Great basing on the workshop also shows some fingerprints on the base, haha. Painted to be finished to get myself to some other projects. Nothing special here, but i think he could do look nice on the gaming table.

Uruk-Hai, Games Workshop, 28 mm


Both captured on photo with lightning in the cabinet, click for larger view:


Mkay... i guess both of them are going to be on ebay soon. For sure they are up to CMON, even they are not models i have spent millions of minutes on. Here are the links - stay honest ;) - they could both not rise high, i know that:


Also i managed to get some new pictures of the latest painted Khorne Bloodcrusher after i had reworked some small areas. He is painted up to be in use on the gaming table with some more of his demon fellas:

Bloodcrusher of Khorne, Games Workshop, 28 mm 


Good to be home again ...

Keep on happy painting!
Regards
Roman

ebay reminder...

by Roman aka jar

posted by Roman, jarhead, Kong


She ends in about 22 hours - just wanted to inform those who might be intrested... this jungle is so weird, ay, ay, ay. Here goes the auction link!


Happy Bidding!
Regards
Roman

Step by Step - Brother Claudio

by Roman aka jar

posted by roman, jarhead, kong

Hi,

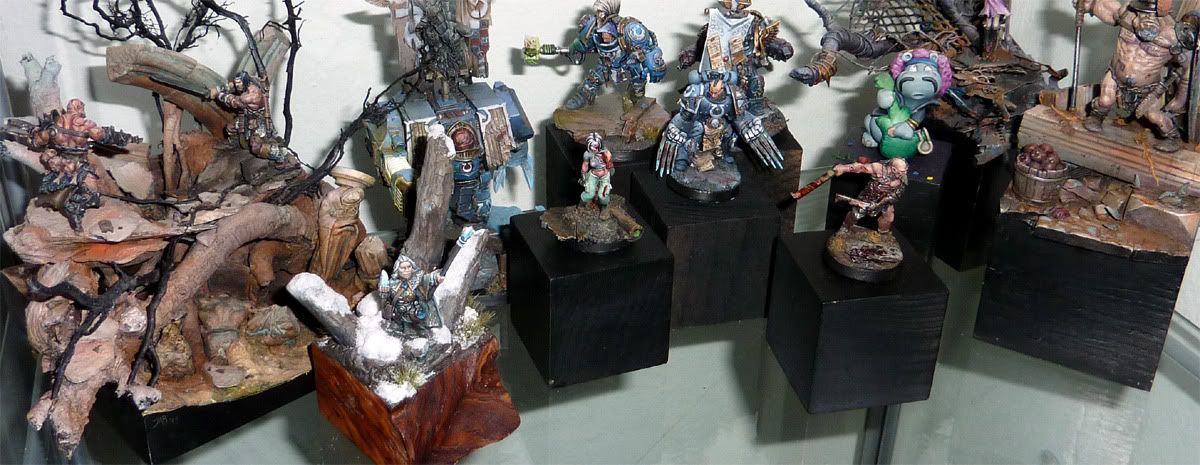
as i told you i did try to make a Step by Step article to Brother Claudio - Blood Angel Space Marine Terminator from the Space Hulk Box, which i had painted lately.

For sure this is not the greatest Step by Step showing every inch of work i had done. This is simply done to show you some thoughts of mine i had made while doing him. I guess maybe some of you could take those thoughts as an inspiration or simple enjoy reading this - at least i hope so.

An article on how i did the base you may find here!

Priming

I did start painting him on the usual way i prime my miniatures:


First Shadows

I don't like to work a lot with the Airbrush, in the end i don't even like to explain things as i am still a real noob with it and i know that not anyone has an Airbrush at home. I got one, but must say that i love to do most of my stuff with a brush, in my eyes here is way more life in the things you may achieve, even they are not as clean as an airbrush would do.
Working to much with the airbrush makes you forget how to work with a brush and a brush dances way better with colours in the scale of 28 mm miniatures.

I sometimes use it for the basic colours, shadows mostly. Here i did spray it with a soft mix from Ultramarine blue + Scab Red + and a tip of Chaos Black from the lower side to only reach the shadow parts. Bad photo, Roman, bad Roman...


Next Step has been a spraying phase with a mix from Blood Red and Red Gore on the whole model, softer in the lower parts where the shadows shall stay the most. Also i have put a tip of Fiery Orange in that mix for the upper areas, spraying from above. After this i did start to paint most of the other parts in a mix of Chaos Black + a tip of Graveyard Earth.


The base did get a basecolour from Regal Blue and Chaos Black, gently put Bleached Bone in to focus the brightest points at the base for further steps. I just did this to see where it'll go in the end.


Starting the Brush work

I did get back at the brush, leaving the airbrush left beside. I did paint up mostly every area left with pure black + a tip of graveyard earth. Black is a good basic to paint up metallics for me lately. The skulls and some other parts did get a basic colour from Charadon Granite by Citadel's Foundation colours. Also i brought up the highlights on the red armour a bit brighter by using several glazes of Fiery Orange, followed by Fiery Orange and a tip of Elf Flesh.


The OSL has been started by making the claws pure white, glazing them with a mix of Hawk Tourquise and Ice blue. On his left side i did start going brighter there by adding skull white step by step to that mix and bringing the light to the areas the OSL hits. Repeating this at the other claw for sure (not at the picture).


The gems have been started with a black basecoat.
The eyes had been painted in a basecoat of goblin green.


The base has been drybrushed with a mix of Fortress Grey and Bleached Bone, more Bleached Bone to the upper parts.


Further Steps

The metal parts have been set on the black basecolour, with using Vallejo Bronze 70998, followed by Vallejo Gold 70996 for setting up the first highlights in the metals. In both tones i mixed in a real small tip of Camo Green.

The Armour has been highlighted with more Elf Flesh + Fiery Orange in the chosen brighter areas, adding a bit of Space Wolfs grey to the brightest parts, using pure Space Wolfs Grey for the upper edges. After this step the armour has been darkened again with several thin glazes fromTamyia X-27 + a Tip of Chaos black to intense the shadows. Going strictly darker to the legs, as i want the focal point high on the miniature.

The claws have been glazed darker with glazes from Hawk Tourquise and a Tip of Chaos black. After this step was done, i mixed in a tip of white in the basecolour of the claws - Ice blue and Hawk Tourquise - tio bring out the edges a bit more.

The skulls and iconography this guy has everywhere around have been started on Charadon Granite as mentioned above. I did slowly mix in Codxex Grey to bring in some highlights. As far as i can remember also the highlights on the armour parts which are in between the different armour areas and the cable things have been highlighted that way too.


The base has been drybrushed with a touch of ice blue. Then snow has been applied like described in this article. Also the icicles had been added in the way described here! I had done this at this point of the Work in Progress to get a better hold on how the miniature on top will turn out in the end to achieve an harmonic overall look in the end. This comes and goes like the muse wants to, no fixed plan at all.


Final Steps

Again i have to say sorry at this point for not having scribbled everything i had done in this step. This is often getting a real concentrating phase while painting a miniature where i forget mostly everything around. I will do an article on the "Finish-Phase" of a miniature in the future. Whatever i try to bring everything together as far as i can remember.

The whole red armour has been set in more shadow and light to the edges by going darker with more thin layers of glazes and bringing more brightness to the edges.

The metal parts have been redone from the base gold to some silver tone as the gold didn't work at all for me on the model. It is still somehow there but very subtle under the new layer.

The skulls had been set in shadows again with some glazes of graveyard eart first, adding a tip of chaos black to it in the darker shades. The lights on the skull also have been intensed with using Bleached Bone, final light set with Bleached Bone adding a Tip of Skull white to it.

Dirt has been applied with using a blister sponge carefully at the edges of the armour.


The claws OSL has been made stronger by bringing up white into the mix and also getting back to darken some areas with the glazing colours for shadows mentioned above.


The eyes have been done from the above mentioned basecoat of goblin green, adding more and more Sunburst Yellow to it, final light in the upper area with a tip of white in that mix. 


Ahh, damm... really my brain gives it up after the last weeks and the time which has passed between painting this fella up and writing this. What i can say is that this final work is very important by making darklining between the different areas of the model to better seperate them for the eye and in the other hand making the lights stronger, especially at the edges for making the eye walk from the overall miniature to the focal area you chose - in this case the helmet.

I will promise to write an article about that, after you see mostly every Step by Step ending up in such a brainless mess by me. Sorry.


I hope this can be taken for inspiration or something else, if not i totally have written it for being useless, haha.

Keep on happy painting all around globe!
Roman

Finished Miniatures and some WiP Stuff

by Raffa

Posted by Raffaele, Capuchin, Picster ...

Hey everyone!

At very first, don't forget to check out the tutorial section regulary, we update this stuff so often that many tutorials are left unseen like for example the very good self made rust tutorial -> LINK :)

Today i shot some pictures from my current projects and some WiP stuff...
First the two finished projects...

The first is a conversion of Krakens Carlos....

She felt how he got closer with every step....
heard him sniffing for her smell through his respirator making this insufferable sound....

She hates this noise. It sounds like rat feet scratching through tunnels, a high pitched, rattling sound that makes her hair stand up on end...

But this day she won't run.
This day one will be dead and one will be alive.
She checked her looted gun a last time and waited for his antic to come around the corner to look for his prey... she'll only have one chance!


Here's the CMON Link, vote if you like it, write me some comment if you don't! :)

The next Mini was made on the workshop in Hamburg...
It's a nurgle demonette... ahem don't ask... i just wanted to make one because i like nurgle :D


If you want... ahem same game as always: CMON Link

I hope you like those two finished projects!
Here is some WiP stuff.

My space wolve slowly goes forward....


So far for this small update :)

Cheers,
Raffa

Weekend Playlist Adding IXX

by Roman aka jar

posted by Roman, Kong, jarhead

Oh dear...

you all might think i must have lived without music at all in the last weeks. I didn't. Music was always with me i just had no time to drop my thoughts and music in here. I am not sure if anyone is really intrested in the music that inspires me to paint, think about paint or just relax. Whatever, the jungle is big so those who are not intrested are always welcome to just ignore things they are not intrested in. As i have passed about 2 weekend addings to the playlist i maybe will do some more songs in this one.

First one goes out as a tribute to the muse, which drives me, no idea what she really is but she is there in my heart. I was listening a lot to this great movie Soundtrack the last weeks and this song is just awesome - the video, which shows a scene from the movie is some kind of definition to on how maybe my muse or muses should look like, when i'll meet her/them - in the end my muse is always doing the same to me, haha - i hope you enjoy:


You now might realize that i really love that movie and the Soundtrack - here goes another one from it:


I am boring i know:


Another one, which i love:

One for the ladys... thanks, Raffa for showing me, haha, so great:


That's it... not more - the muse did spoke to me :)

Keep on happy painting!
Regards
Roman


Kong's WIP Thoughts Jan02

by Roman aka jar

posted by Roman, Kong, jarhead


Aloa,

to another round of my WIP-Thoughts. This time i will keep it simple. After leaving some exciting moments with a lot of painting classes behind me i finally arrive home for a longer period of time. Why i am telling this? Mmh, being home is fine, staying home for a while helps me focus on my painting again and that is what i'll do in the next months, hehe. Can't wait to get it started, but still resting a bit and finishing off small side projects which grow during the workshop time.

Still have a bunch of things on my to do list, like writing the latest review of the workshop and sending out all the handouts to the participants (which are being changed a bit and prepared at the moment), writing emails, making important phone calls, spent time with my lady, writing Tutorials, spent time with the neighbour babys, get back to some friends i did not heard the last months, writing private messages, realizing some ideas for MASSIVE VOODOO and typing, typing, typing... nah, not really intresting as i am always the man of constant sorrow - let's get it on with bamboo boogie, the important things...

The Arkvenger will be finished for the competition of the Duke of Bavaria in the end of April in Ingolstadt.

The sniper tower will get another run with 2K water on it, after i did paint everything i had failed in pure black, haha.

The Geisha and Denise busts by Pegaso will be painted finally and some more to come for sure, when i realize being home again.

Some gaming comission will drop in also :)

After mati, Raffa and me did sleep in one room in Hamburg - uh yeah, ugly imagination of 3 Apes... nah stop - we had some mad night talk about projects and ideas. After i have a long time project standing around here which started back a long time ago in 2009, it seems the JMD Demon will finally meet his destiny for a private Diorama Project for the Duke of  Bavaria - let me explain how the ideas flow around this project - this has been the start of it all - angelwings again:


Went over to this idea - without stupid wings:


The hext brain fart has been the idea of a duel of good vs. evil - using a Games Workshop Priest of Sigmar to it:


Following this idea the duel has grown in warriors challenging the demon and dark sorcerer (models by Red Box Games):


Started painting and completly lost my motivation to it, but have a lot of stuff like photos and explanations done to it so i will tell some more when the real deal starts.

Losing motivation... When something like that happens i leave it alone, stand the project beside and wait for the day another plan arrives... it now has - a monstrous duel between monsters... 


More to come soon i guess or not, we'll see... the idea has arrived. Now it is time for me to arrive home first... keep staying on the sunny side of life! How? Smile as often as you can :)

Keep on happy painting!
Regards
Roman